


VueX is a library for managing global state. State could be translated with data. Data your application needs which, affects what users sees on the screen. You can think of state as reactive data, data which may change, and such changes should trigger something on the screen. Managing data (state) that affects different components of your app can be tricky.
There are two types of state.
- Local State
- Global State
Local State is the state you manage data inside one of your component, the data then affects this same component. It can also indirectly affect another component, just that it will be a child component. In this case, the data will be passed through props.
Global State is the state that affects multiple components, possibly the entire app. Data which you need in a lot of different places, in a lot of components. And this is where VueX comes in handy.
Understand the Problem
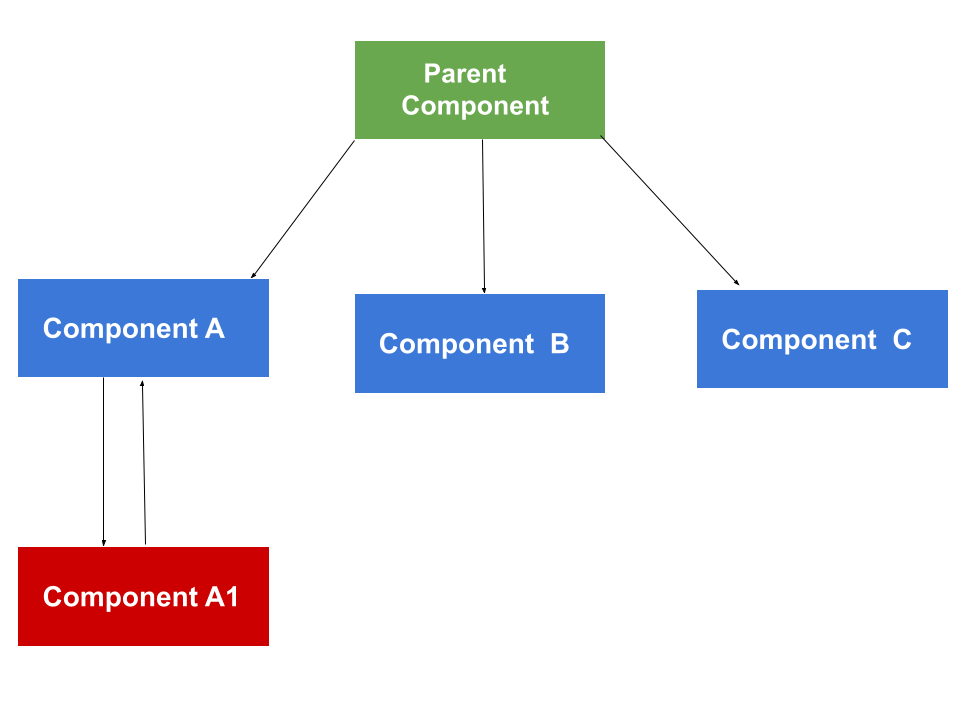
Imagine you want to move data from Parent Component to Component A1, you'll have to send to Component A first, before you can send to component Component A1. It gets more difficult when you need to emit an event from Component A1 to Parent Component.
This is just a simple illustration, your application might get bigger than this, where Component A1 will have sibling components or even children components. When you have such a big your application, use VueX.
Why VueX?
App.vue or similar parent components contain lots of data and logic which isn't needed for the components template but in other components of your application.
It isn't easy tracking where data gets changed or in which way.
Accidental or missed state updates are possible.
N.B: Use VueX only when you have a large application that warrants it, resolve to using
propsorprovide $ injectwhen your application is small
Installing VueX
npm installnpm install --save vuexnpm run serve
State management in VueX can be achieved by creating a store pattern that entails sharing a data store between components. The store controls and oversees the state of your application as well as the methods that are responsible in changing the state. You can say that the Vue store is a centralized way for managing state.
Note that you have only one store for the entire application. Though you can have multiple states. And with states, data can be assessed from any component without injection or passing props around.
Creating and using a store
//main.js
import {createStore} from "vuex"

const store = createStore ({
  state() {
     return{
       counter: 0 //this can be anything
   }
}
})

app.use(store)
-Go to the component(s) you want to use the state
//component
<template>
  <h3> {{ $store.state.counter }}</h3>
</template>
State() is a method and it should return the state object. It is a bit like method data in a component. The objects will hold the application wide data.
//App.vue
<template>
   <h3> {{ counter}} </h3>
   <button @click="plusOne()"> Add 1 </button>
</template>

<script>
   computed: {
     counter(){
        return this.$store.state.counter;
   }
}
methods: {
  plusOne() {
    this.$store.state.counter++;
  }
}
</script>
Now let's see more elegant ways of handling states. One of which is mutations.
Mutations
Mutations are clearly defined methods, which have the logic to update the state. From your components file, you in the end just trigger those mutations, instead of directly manipulating the state. You wouldn't need to go to each of those components to trigger a method, you do that globally using mutation in vuex.
This means that by triggering mutations, all components that want to edit a state do it in the same way.
How do you use mutations?
You use mutations in your store, you don't just have the state() method. You also have mutation.
Mutation takes an object, in which you can define methods. These methods should contain functions to change the state.
//main.js
const store = createStore({
  state() {
   return 0;
},

mutations: {
  increment(state){
    state.counter++
   }
 }
})
This increment method automatically get a state as an arguement. VueX will give you the current state whenever this method is triggered. To trigger mutation in a component....
//component(s)
<template>
    <button @click="plusOne"> Add 1</button>
</template>
<script>
export default{
  methods: {
    plusOne() {
     this.$store.commit('increment')
   }
 }
}
</script>
Notice anything new, yes commit. The commit method is a built-in method which gives VueX allows you to call on a store. And commit takes the name of the mutation you want to perform. The name should be provided as a string.
Passing Data to mutations with payload
Some mutations require arguments. So mutations can take a second (the first arguement is the current state) arguement, a payload. A payload is a data package that can be appended. Payload can be anything; It can be a number, it can be a string, it can be an object.
//main.js
const store = createStore({
  state() {
   return 0;
},

mutations: {
  increment(state, payload){
    state.counter = state.counter + payload.value;
   }
 }
})
You can then use it in your component. commit() takes payload as a second arguement. Your mutation is the first arguement.
//component(s)
<template>
     <button @click="plusOne"> Add 1</button>
</template>
<script>
export default{
  methods: {
    plusOne() {
       this.$store.commit('increment', {value:10});
   }
 }
}
Getters
Getters are computed properties defined directly in the store, which you can use inside any component.
How do you add getter to VueX store?
You add getters in your main.js file, just after state() and mutations
//main.js
const store = createStore({
  state() {
   return 0;
},

getters: {
  finalCounter(state){
    return state.counter * 2
    }
  }
})
You can then use this getter in any component of your choice.
//component(s)
<template>
   <h3>{{ finalCounter }}</h3>
</template>

<script>
export default{
  computed: {
    counter(){
      return this.$store.getters.finalCounter()
    }
  }
}
The above code snippets have one example each, you can have multiple methods in the mutations and getters in your store and they can depend on each other.
Mutations must be synchronous. You're not allowed to have any asynchronous code. So if you run a mutation, it needs to execute step-by-step without any pause and immediately change the state. It's not allowed to do anything that may take a bit longer. This is because if multiple mutations execute, every mutation should get the latest state. And if another mutation was commited, but didn't finish yet, that is unexpected and will lead to errors in your program.
Consider mutations as a relay race, when an athlete A starts the race, he/she wouldn't complete his race until he passes the baton to the next athlete B. This automatically means that the end of A's race marks the beginning of B's race. If A doesn't end his race, B won't start and there will be a problem in the whole race.
Actions
VueX has a better feature used for working with asynchronous code, which is actions. Asides mutations and getters, you can also have actions. Components should trigger actions, which then in turn commit mutations. Actions can now use asynchronous code.
How do Actions work?
Just like states, mutations and getters; you add actions to your main.js file
//main.js
const store = createStore({
  state() {
   return 0;
},

actions:  {
  increment(context) {
    setTimeout(function() {
       context.commit('increment');
      }, 2000);
    },
  }
})
The action will get an object as an arguement "a context object". Context has a commit method too, it commits a mutation, just like you could commit it from inside a component. You can pass a second arguement as a payload and you can pass an object alternatively to the two arguement.
In your component, you then dispatch the action.
//component
<template>
   <button @click="plusOne"> Add 1 </button>
</template>

<script>
export default{
  methods {
    plusOne() {
      this.$store.dispatch('increment', {value: 10});
    }
  }
You can also dispatch a number of actions from inside an action, this can be of help if you're sending an HTTP request, and if it suceeds, you would want to trigger a success action, if you get an error, you would want to trigger an error handling action. You can have one action that dispatch multiple other actions in reactions to different results of HTTP results.
Mapper helpers
MapGetters
//component
<template>
  <h3>{{ counter }} </h3>
</template>

<script>
 export default {
    computed: {
      counter() {
        return this.$store.getters.finalCounter
     }
  }
}
</script>
The above code snippet is what you're used to, so imagine you have more than one computed properties in a component, there is no harm in listing all out, but you can make your code cleaner using mapGetters.
//component
<template>
  <h3>{{ finalCounter }} </h3>
</template>

<script>
import {mapGetters} from "vuex"

 export default {
    computed: {
      ...mapGetters(['finalCounter'])
  }
}
</script>
mapGetters takes an array as an arguement, and you list all the getter names as strings; strings you want to have as computed properties in this component.
mapGetters gives you an object with keys as method names and values as methods. This object is full of computed properties which are automatically defined for you.
This object when combined with ...(Object spread operator), sometimes known as rest parameter; spreads it out into individual function in the computed or individual methods in the object.
MapActions
mapActions has a similar work with mapGetters. This code snippet is what you've learnt previously.
  //component
<template>
  <button @click="plusOne"> Add 1 </button>
</template>

<script>
 export default {
    methods: {
      plusOne() {
        return this.$store.dispatch('increment')
     }
  }
}
</script>
The above code snippet wouldn't be the best way to handle your actions if you have more than two in an application. You end up having a long lists of computed properties. You can use mapActions to solve that.
//component
<template>
   <button @click="increment"> Add 1 </button>
</template>

<script>
import {mapActions} from "vuex"

 export default {
    computed: {
      ...mapActions(['increment'])
  }
}
</script>
mapActions() also takes an array and you list all the actions you want to have as methods in this components. You can also pass an object instead of an array. You can then define method names you need for your component as keys, while the action would be the value.
//component
<template>
   <button @click="inc"> Add 1 </button>
</template>

<script>
import {mapActions} from "vuex"

 export default {
    computed: {
      ...mapActions({
          inc: 'increment'
     })
  }
}
</script>
Organizing your store with modules
As your store grows, you can split your store into what is known as modules. You should have only one store per application, but this stores can be made of multiple modules. This is to keep your code more maneageable.
Without setting up any module; by default, you have just one module, the root module/root state. You can then add as many other modules as you want. Each module will have its own state, mutations, actions and getters.
The code snippet below is the way of creating a store, which you have learnt previously in this article.
const store = createStore ({
  state(){},
  mutations: {},
  actions: {},
  getters:{}
})
To create a module of your store, you create a const <module name>....
//module
const counterModule = {
  state(){},
  mutations: {},
  actions: {},
  getters:{}
}
How do you make your modules available in your store?
Your const store will now take a modules option. This option is an object, in which you merge all the modules together in one store. You give every module an identifier. In the snippet below, number is identifier for your counterModules
const store = createStore ({
  modules: {
  number: counterModules
  }
  state(){},
  mutations: {},
  actions: {},
  getters:{}
})
When you merge all the module into this store, it is as if you would have to find all the getters, mutations e.t.c. directly in the store, you will be able to dispatch all the actions and getters even though you're now using a module.
The state of a module is actually treated as a local state inside of the module. Mutations, actions and getters are global, you can access them as before on the main store, but the state is local to this module, so anything you do on this state, inside of this module refers just to this state module alone.
Namespacing modules
Asides this local state, you can also make the entire module local. You can make it namespaced. This is to make sure that multiple modules are clearly separated from each other.
And why do you need to do that?
As your application grows, you could have name clashes, you might be using the same getter or the same action name in different modules of the same store.
To avoid that, you can namespace modules of the same store. Namespace has a similar feature to scoped attribute in a component css styles.
You namespace a module by adding an extra option to your module and then set it to true
namespaced: true
//module
const counterModule = {
  namespaced: true,
  state(){},
  mutations: {},
  actions: {},
  getters:{}
}
By doing this, you're telling Vue that the entire module and not just the state should be detached from the rest of the store.
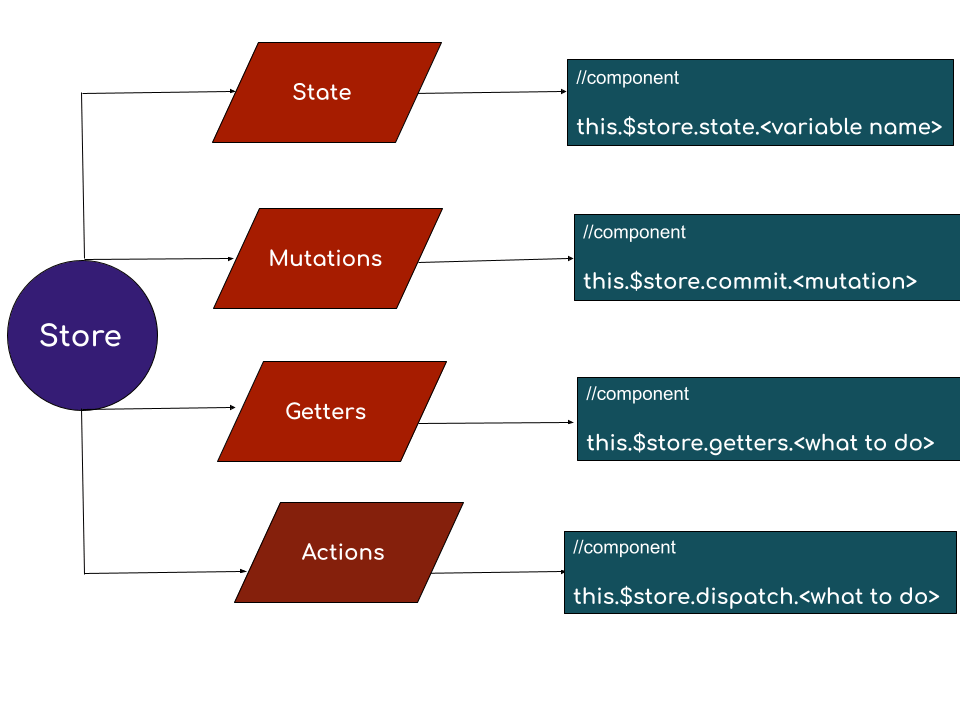
The chart below shows the summary of state management by VueX.
As at the time of writing this article, I was still a learner; I'll gladly welcome suggestions, comments and corrections.